UrbanSim Accounts & Settings
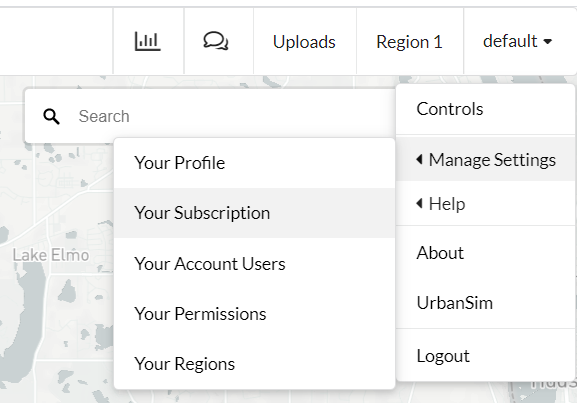
Your UrbanSim user account gives you access to UrbanSim services that you have subscribed to or to UrbanSim services that other subscribers have invited you to. You can view and edit settings associated with your account from within UrbanCanvas by clicking on your username in the upper right hand side of UrbanCanvas and selecting one of the options listed under Manage Settings. Each option will bring you to that section of the UrbanSim Account Manager. Once in the Account Manager you can enter into each section of the manager by either using the tabs at the top of each section or can click on your username in the upper right hand side of the Account Manager and select one of the options listed in the dropdown.
UrbanCanvas Regions
UrbanCanvas regions in UrbanCanvas Modeler are silos of distinct geographic areas that have a specific model implementation, settings, data, and users associated with it. An UrbanCanvas region can be thought of as a project where data and activity for a specific modeling workflow or exercise are accessed and stored. Depending on your subscription agreement, a single subscription can have multiple regions associated with it each with their own set of users and data. UrbanCanvas regions are initialized and created by UrbanSim at the start of your subscription.
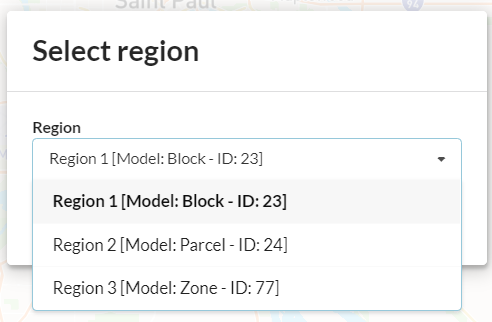
The name of the region that you are currently viewing in UrbanCanvas and in the Account Manager is displayed on the right hand side of the UrbanCanvas and Account Manager user interface header next to your username. You can view basic metadata about the region by placing your mouse over the region name. This information includes the region’s: UrbanSim model template type, local spatial reference system (SRS), UrbanSim unique region identifier, and UrbanSim model base year. If you have access to more than one UrbanCanvas region, you can easily switch between different regions in your account by clicking on the region name in the UrbanCanvas header to bring up the region selection window. Then choose from a list of regions to switch to.
More information on the regions associated with your account can be found within UrbanCanvas by going to the dropdown menu under your username and navigating to Manage Settings > Your regions or can be accessed from within the UrbanSim Account Manager by selecting the Regions tab or going to the dropdown menu under your username and navigating to Your Regions. From here you can view in a table all the regions your user account is associated with.
If there are Public Viewer regions available to join, you will see the Join a public region button at the bottom of the table. Click on the button to select from a list of Public Viewer regions to join. After joining you can at anytime choose to enter the region as a Public Viewer user using the region selector tool. If no Public Viewer regions are available, you will see a grey No public regions available indicator instead.
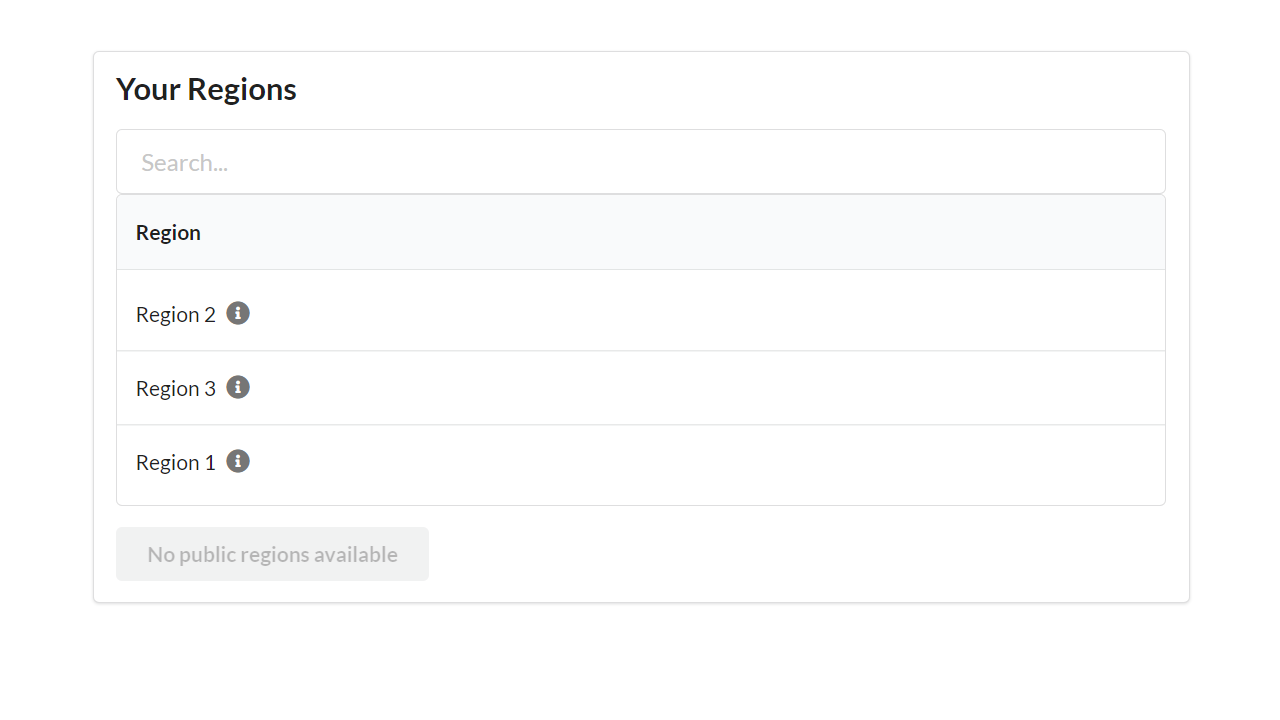
Changes to any of the information displayed for your associated regions can be requested by your account admin by contacting us here.
Creating an UrbanSim account
UrbanSim user accounts for new subscribers are created by UrbanSim at the start of your subscription where at least one user must be designated as an account administrator. Account administrators can manage users associated with their subscription and can invite new users to their account by email at any time.
For information on how to create a new UrbanSim user account to access a Public Viewer region see here or to have an existing user join a Public Viewer region see here.
Reset a forgotten password
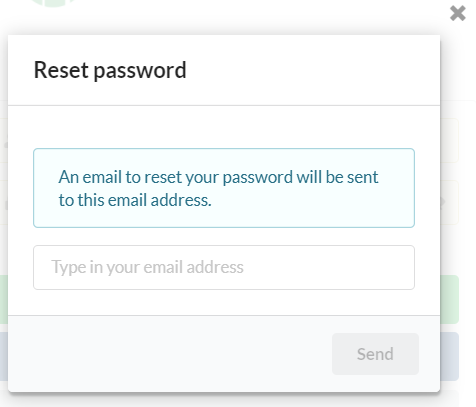
If you have forgotten your password and you can not login, you can reset your password by going to the UrbanCanvas login page and clicking on the Forgot your password? link under the login button. Enter your email address associated with your UrbanCanvas account and a reset password email will be sent to you with instructions on how to reset your password. Users who login via SSO cannot use this functionality.
Your profile
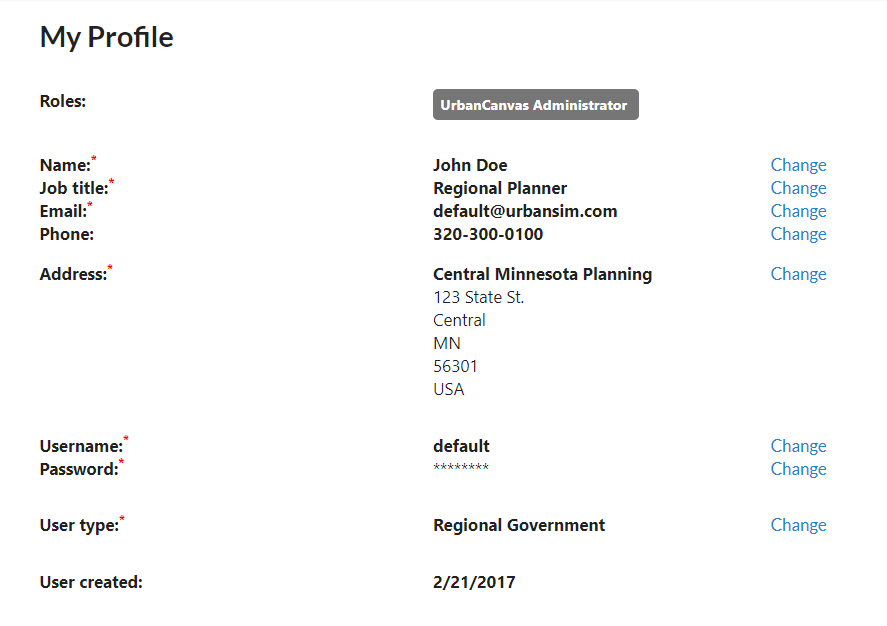
Your UrbanSim user profile can be accessed from within UrbanCanvas by going to the dropdown menu under your username and navigating to Manage Settings > Your Profile or can be accessed from within the UrbanSim Account Manager by going to the dropdown menu under your username and navigating to Your Profile. Your profile contains important information about your user account and contains tools to manage your user account. From here you can update your profile information including your account password, username, and your email associated with your UrbanSim account. Your profile also contains information that can be useful for other users in your subscription to help identify you in UrbanCanvas when data are created and modified such as when creating or replying to comments. Users who login via SSO cannot edit their profile information, changes must be made by your Enterprise Application manager.
Name (Required)
Your first and last name. This name will be displayed on data in UrbanCanvas that you author or modify, such as comments, to help other users in your subscription identify data and changes made by users.
Job title (Required)
Your job title.
Email (Required)
Your email address that you would like associated with your username. Both your username and this email address can be used to login to UrbanCanvas. Your email address will only be used by UrbanCanvas to send you automated emails to inform you of changes made to your profile or subscription. Emails must not contain spaces or uppercase characters.
Note
All automated emails including user invitations and notifications on changes made to your profile and password will be sent from info@urbansim.com. We suggest you whitelist this email address to ensure emails do not go to spam.
Phone (Optional)
Your phone number.
Address (Required)
Your place of work and address.
Username (Required)
Your username (e.g. UrbanCanvas alias) to use to login to UrbanCanvas. Both this username and your email address can be used to login to UrbanCanvas. By default, your username will be either your firstname.lastname or your email address, however you can change this at any time. Usernames must not contain spaces or uppercase characters.
Password (Required)
Your password to use to login to UrbanCanvas. You may change your password at anytime. Contact us here for any issues related to your user account password.
User type (Required)
Your user type is a general classification of your industry (e.g. student, regional government, municipal government etc.).
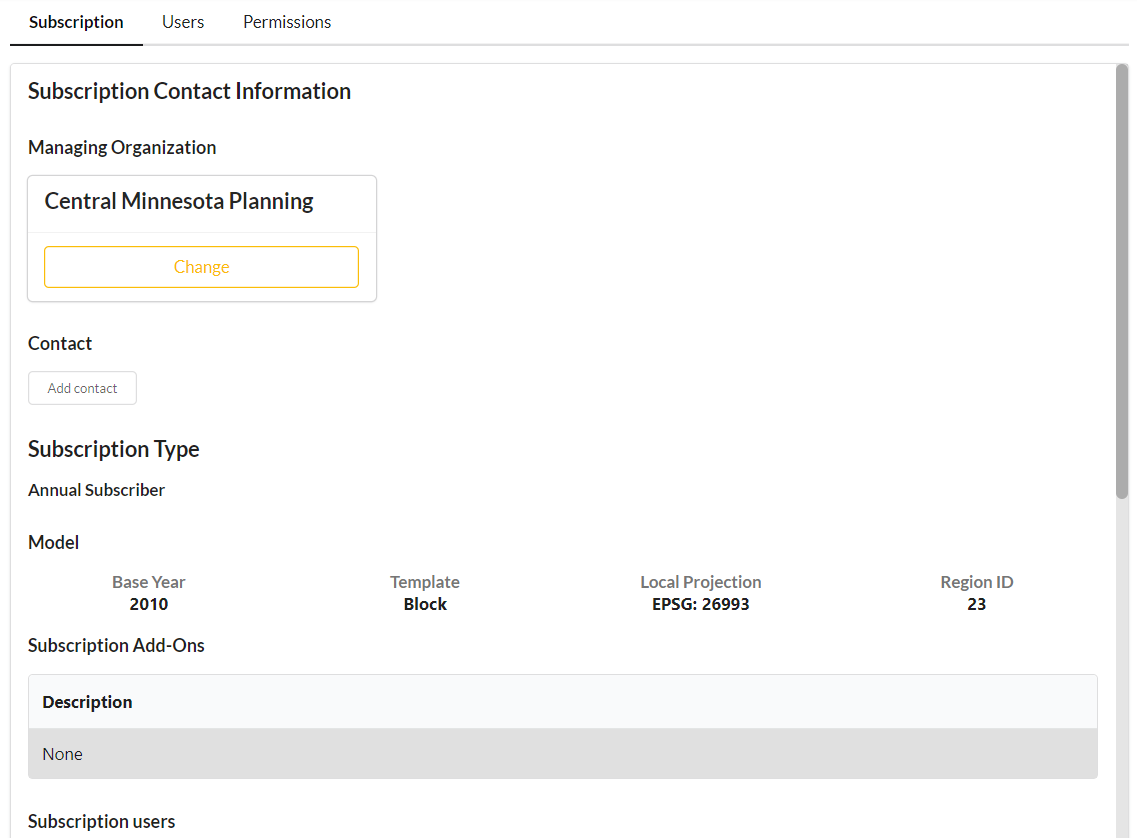
Your subscription
Information on your UrbanSim UrbanCanvas subscription can be found within UrbanCanvas by going to the dropdown menu under your username and navigating to Manage Settings > Your Subscription or can be accessed from within the UrbanSim Account Manager by selecting the Subscription tab or going to the dropdown menu under your username and navigating to Your Subscription. Your subscription can be associated with multiple regions.
Admin subscription page
Modeler and viewer subscription page
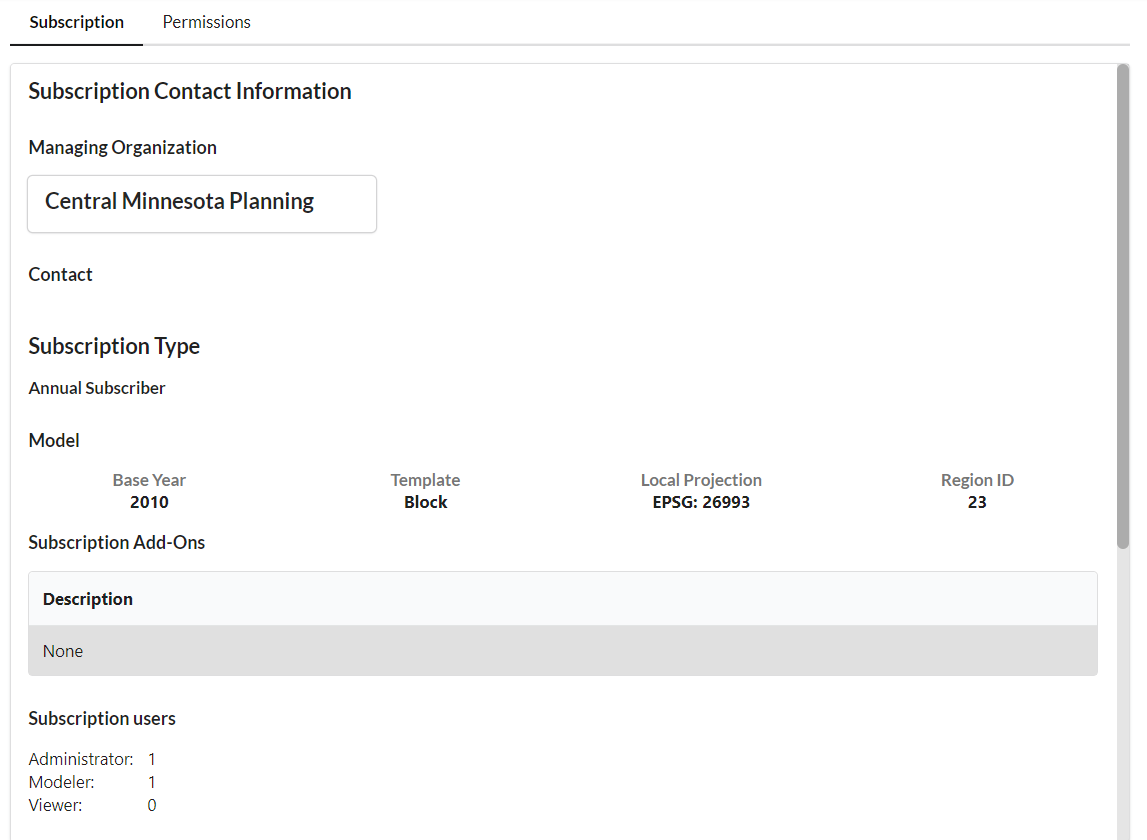
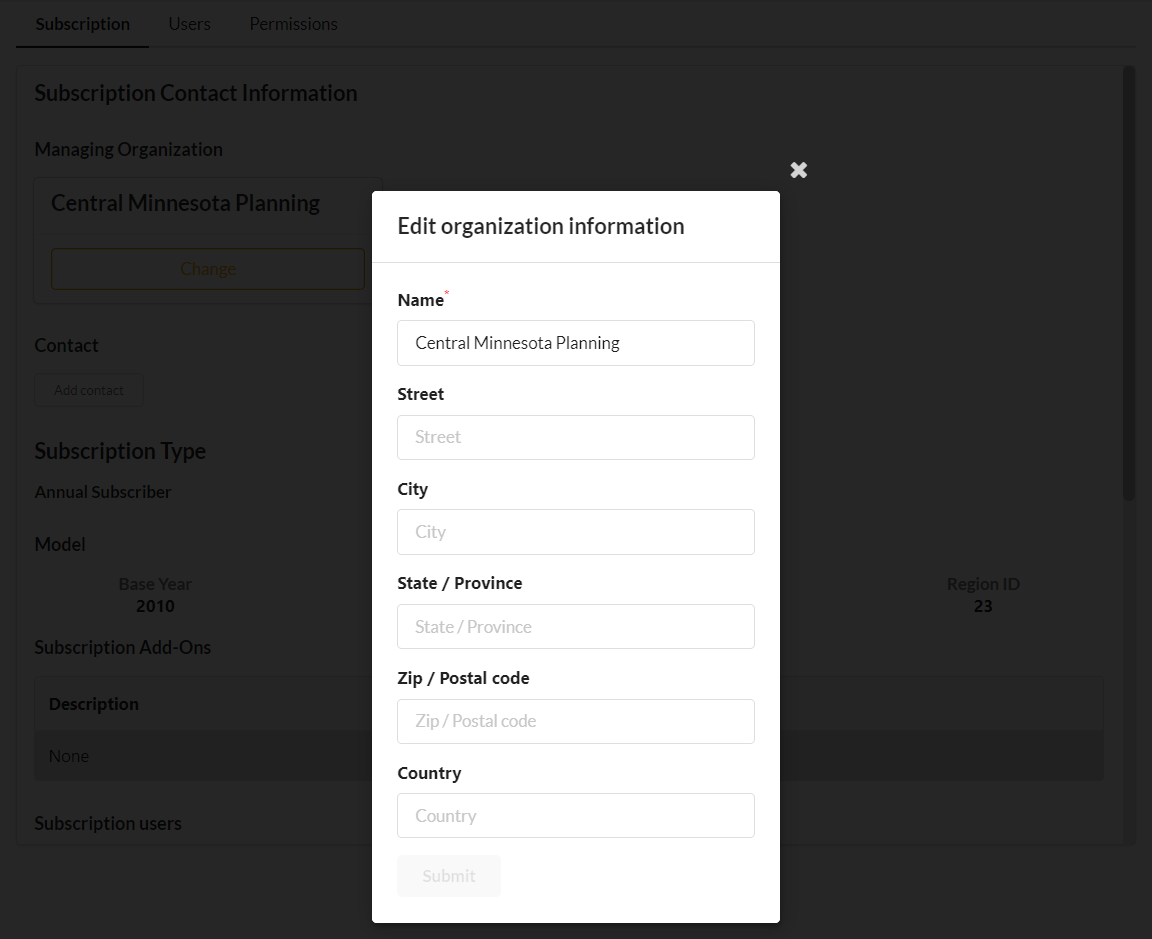
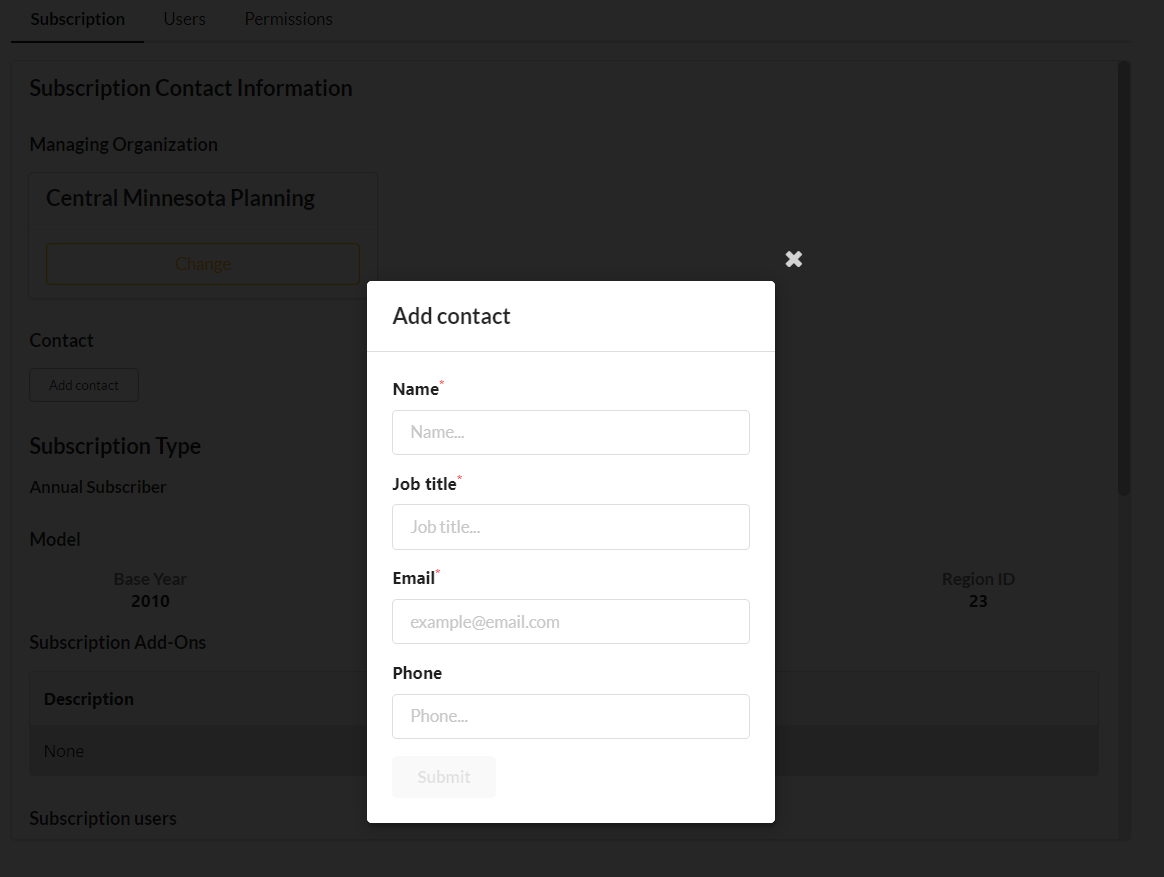
Subscription Contact Information
Account administrators can create and edit the subscription contact information on this page. This contact information is useful for users in your account to understand who to contact for subscription or account information.
Managing Organization
The name and address for the organization or company that owns the subscription.
Contact
Contact information for which users should communicate any subscription or account questions to. Multiple contacts can be added here and do not have to be UrbanSim users.
Subscription Type
Subscription Type
Your subscription type associated with your UrbanCanvas region which can be either an annual or a trial subscription. See here for information on subscription usage and data limits.
Model
Metadata associated with your UrbanCanvas region including: UrbanSim model template type (e.g. Block, Parcel, or Zone), local spatial reference system (SRS) using the European Petroleum Survey Group (EPSG) Geodetic Parameter Dataset identifier, your UrbanSim unique region identifier, and UrbanSim model base year. To change any of these attributes contact us here.
Subscription Add-Ons
A list of active subscription add-ons associated with your UrbanCanvas region such as the California Nature Conservancy’s Conservation Module.
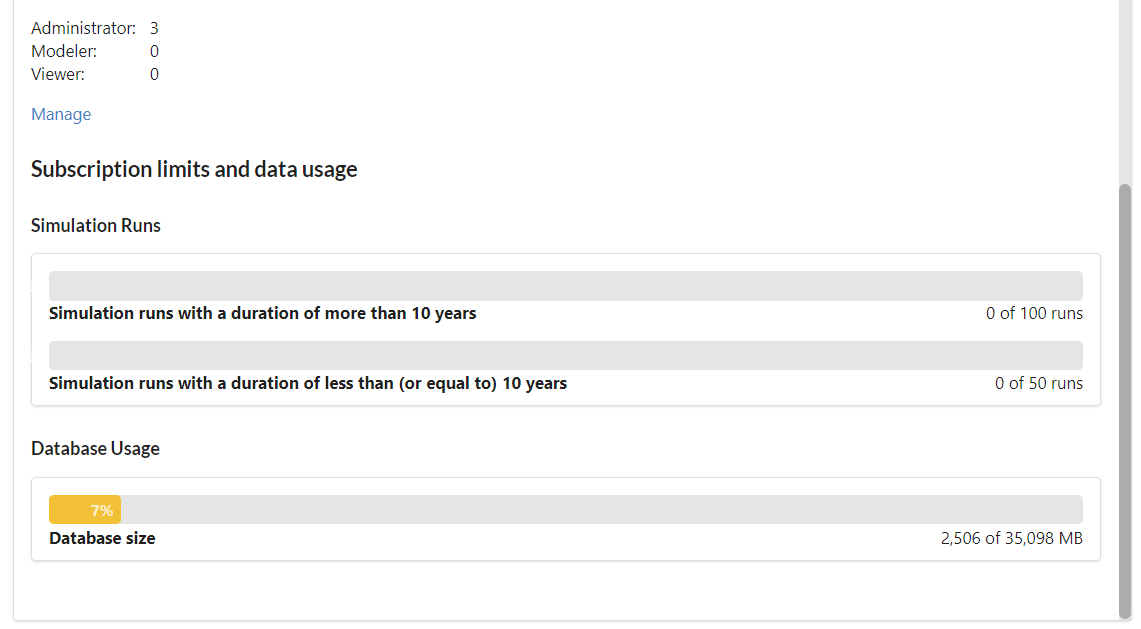
Subscription users
A summary of the number of users associated with your account subscription for each UrbanCanvas role in your UrbanCanvas region. Administrators can manage users from the Users tab.
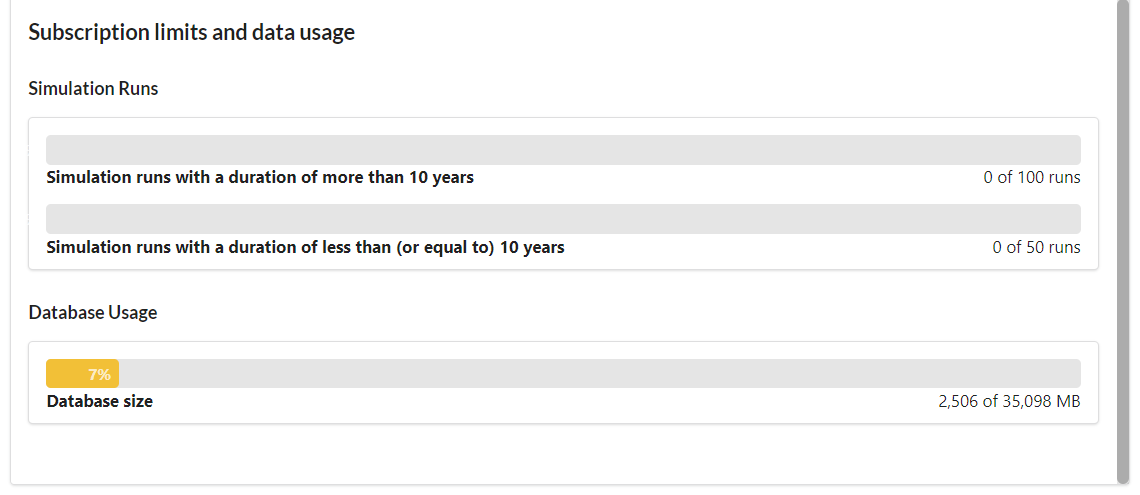
Subscription limits and data usage
The subscription limits and usage section displays your current data and simulation run progress towards your maximum allowed allowance associated with your UrbanCanvas region. The limits displayed here correspond to the simulation runs agreed upon in your subscription agreement. Used run allowances for annual subscribers are automatically reset to 0 each year at the date that your subscription was created. To request an increase to any of your allowances please contact us here. Additional run bundles may be purchased at any time and never expire.
Limit category |
Standard limit |
Description |
|---|---|---|
Data |
150 GB |
Total size of data stored on your database (e.g. uploads, indicators etc.) |
Partial simulation runs |
150 |
Simulation runs with durations less than or equal to 10 years |
Full simulation runs |
100 |
Simulation runs with durations greater than 10 years |
Maximum simulation end year |
2060 |
Maximum allowable simulation end year |
Note
Any of the above standard annual subscriber account allowances, including max simulation end year, can be increased at any time by contacting us here.
UrbanCanvas Trial
To request a free 30-day trial of UrbanCanvas please contact us at info@urbansim.com. Please note that trials are not yet available for students or academic institutions.
The 30-day trial provides data for the Minneapolis-St Paul metropolitan area in Minnesota and uses the Census block version of the UrbanSim model system. The trial provides access to the full set of platform features however you are limited to only 5 simulations of 5-years for the purposes of this free trial. Once the trial period expires, you will be prompted with an opportunity to provide feedback and to upgrade to a full subscription.
Limit category |
Standard limit |
Description |
|---|---|---|
Data |
10 GB |
Total size of data stored on your database (e.g. uploads, indicators etc.) |
Simulation runs |
5 |
Maximum number of simulation runs |
Maximum simulation end year |
2015 |
Maximum allowable simulation end year |
Your account users (Admin only)
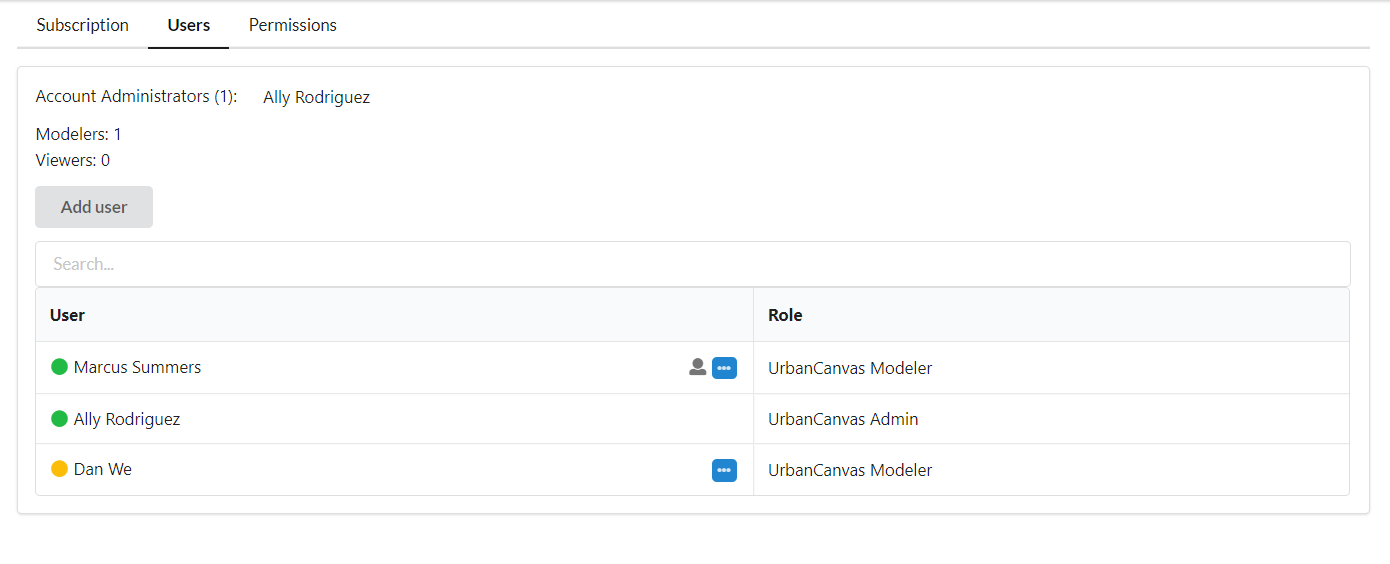
Information on the UrbanSim users associated with your UrbanCanvas region is only available to administrator users and can be found within UrbanCanvas by going to the dropdown menu under your username and navigating to Manage Settings > Your Account Users or can be accessed from within the UrbanSim Account Manager by selecting the Users tab or going to the dropdown menu under your username and navigating to Your Account Users. From this page, administrators can invite new users, change user roles, and remove users in their subscription. Admin users who login via SSO cannot invite or remove users and cannot change user roles, changes must be made by your Enterprise Application manager.
All users in your subscription are listed in the users table. If your account is tied to multiple UrbanCanvas regions, you can switch between each region using the switch region selector to view the roles set for users in each region. Users displayed with no role will not have access to the region you are currently viewing. Use the ![]() icon to view the user’s profile contact information for each user.
icon to view the user’s profile contact information for each user.
Inviting new users
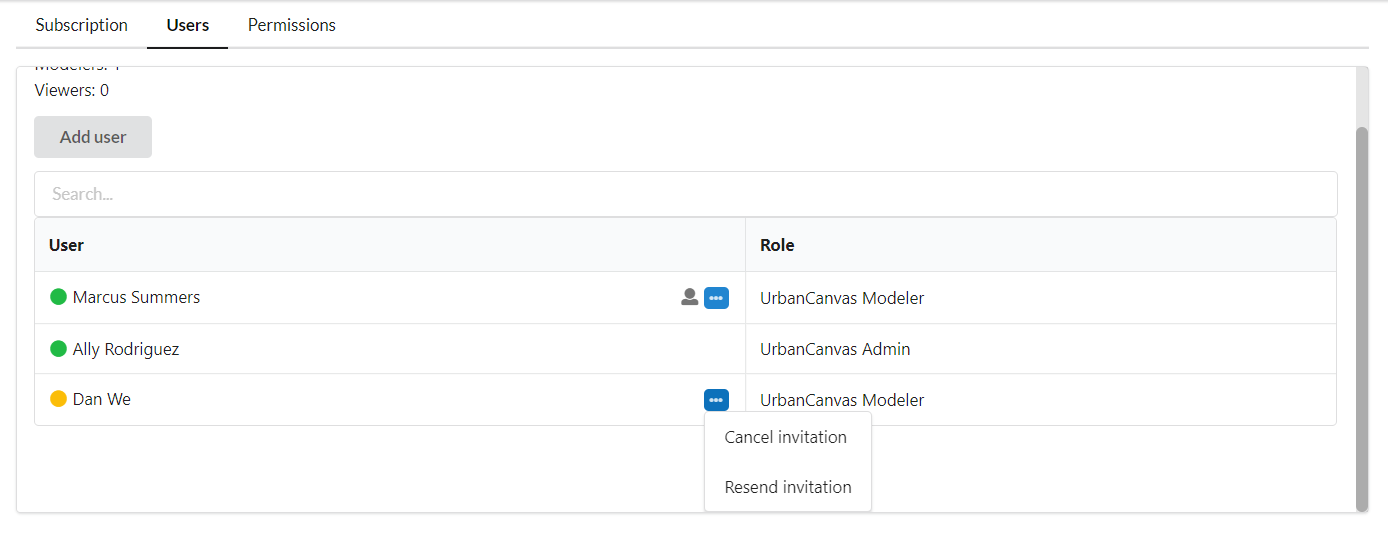
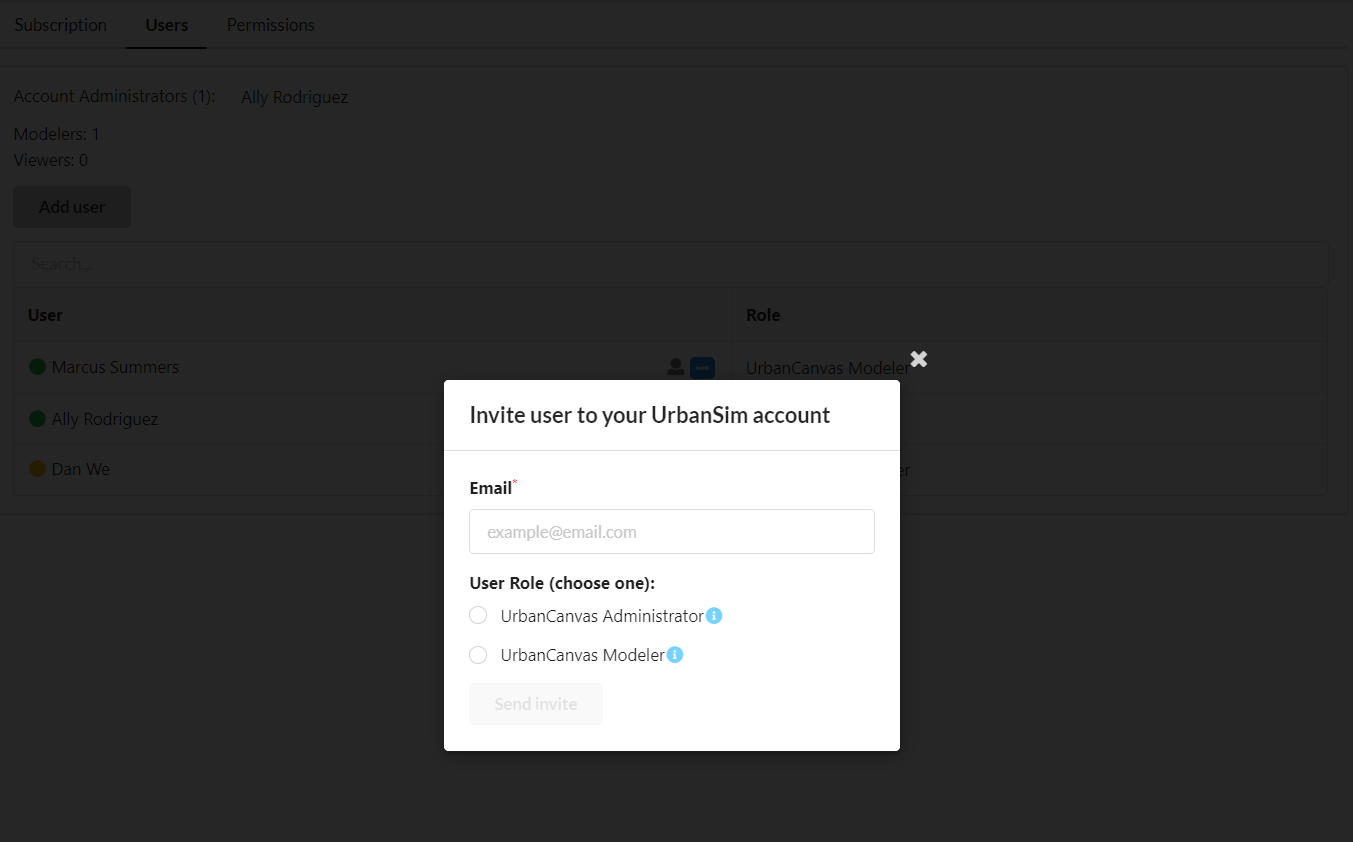
Click on Add user and in the popup fill out the form with information on the user to invite by specifying their email address and select the UrbanCanvas role for the user. The user will be sent an email informing them of the invitation and they will have 7 days to accept the invitation and or create their UrbanSim account. Administrators will be notified by email when the user has accepted the invitation. To reinvite a user that was unable to accept the invitation within the time allotted use the blue action button by their name or email and select the reinvite option. The user will be sent a new invitation by email. If you no longer wish to invite a user that has a pending invitation, use the blue action button by their name or email and select the cancel invite option. The user will be notified by email that their invitation has been canceled.
Each user in the users table has a status icon that indicates the user’s invitation status. Green indicates user has successfully accepted an invitation and a tooltip is provided showing the date of acceptance. Yellow indicates user has an invitation pending and a tooltip is provided showing the date the invitation is set to expire. Red indicates user invitation has expired before the user could accept or there was an error.
Changing user roles
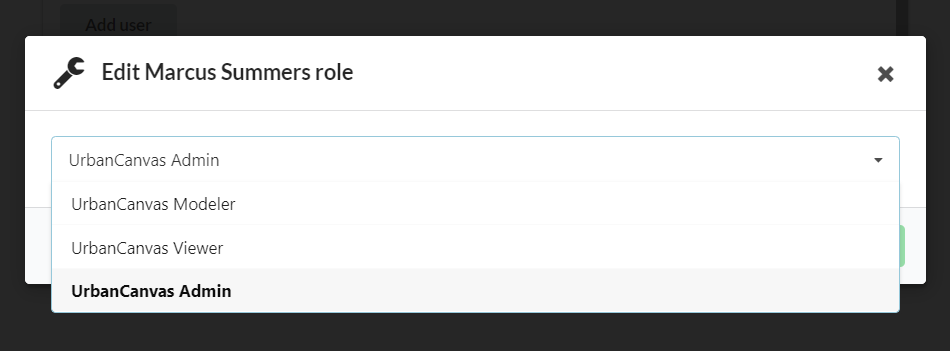
Use the blue action button on the user and select Edit user role. Select the new role for the user in the dropdown. Users will be notified by email when their role has been changed.
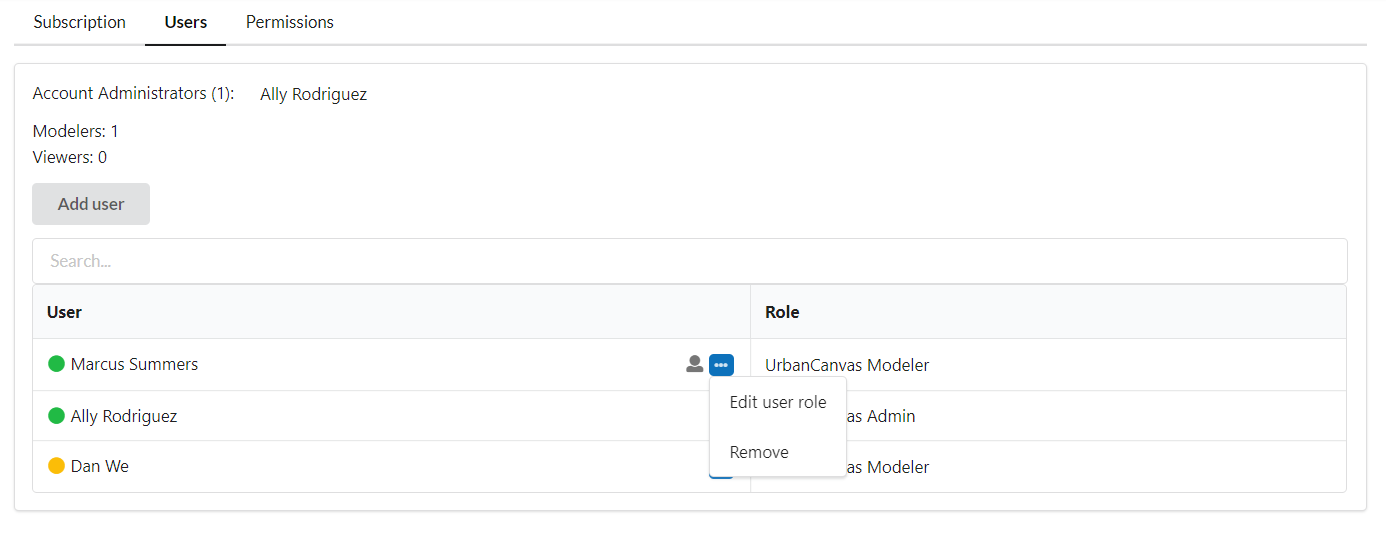
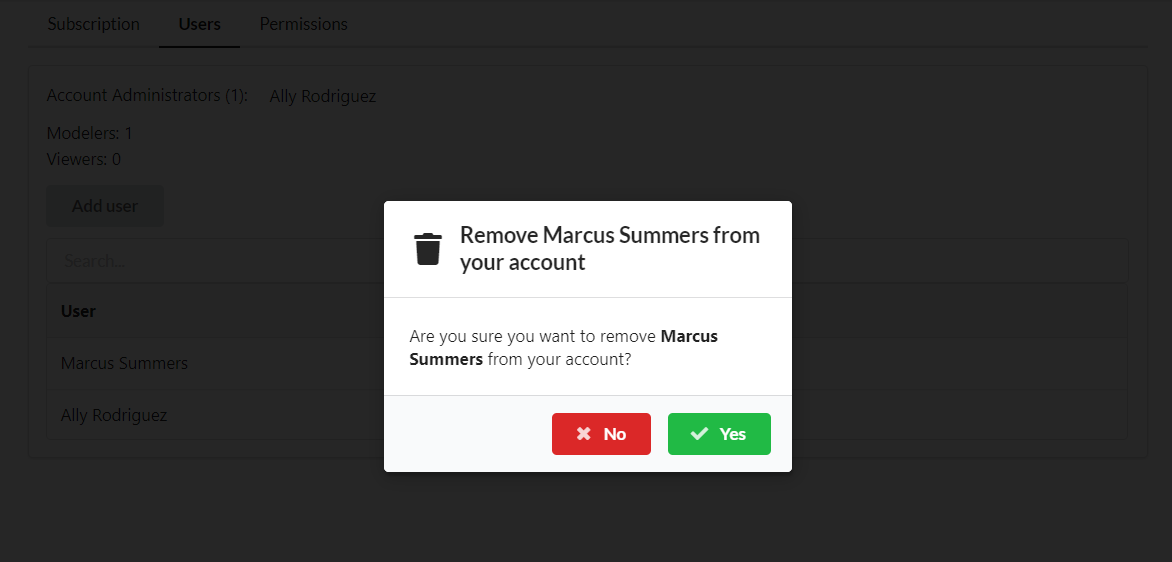
Removing users
Use the blue action button on the user and select Remove. User will be removed from your subscription account and any UrbanCanvas data associated with the user (e.g. uploads, comments etc.) will persist in your account. Users will be notified by email when they have been removed from your account. Users that are no longer associated with an active subscription or an active UrbanCanvas region may login to view and edit their UrbanSim profile but will not be able to access UrbanCanvas.
To re-invite a user that has been removed, go through the invite user workflow and enter the user’s same email address to re-invite them to your account. The user will be sent an invitation to re-join your region via email. Once the user has accepted the invitation, they will have access to your region.
Your permissions
Information on your UrbanCanvas role permissions can be found within UrbanCanvas by going to the dropdown menu under your username and navigating to Manage Settings > Your Permissions or can be accessed from within the UrbanSim Account Manager by selecting the Permissions tab or going to the dropdown menu under your username and navigating to Your Permissions.
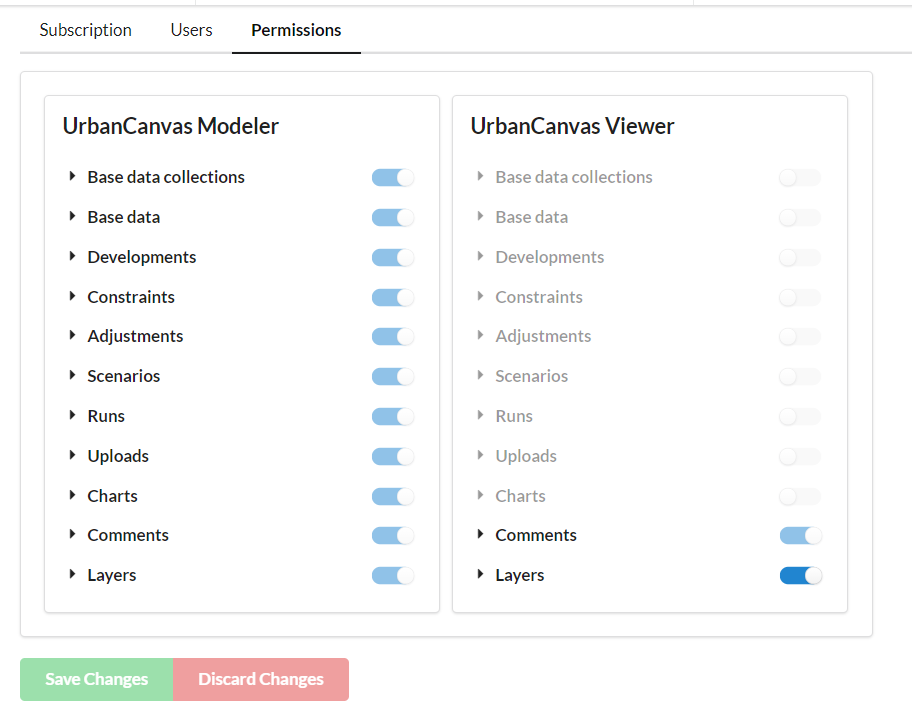
Viewing your role permissions
UrbanCanvas Modelers and Viewers can see from a list of UrbanCanvas features what their role has been given access to. Any feature that is turned off will be hidden and inaccessible to users with that role. Modeler and Viewer users should direct any permission questions to their account administrator. Only administrators can change certain permissions for Viewers.
Admin permissions page
Modeler and viewer permissions page
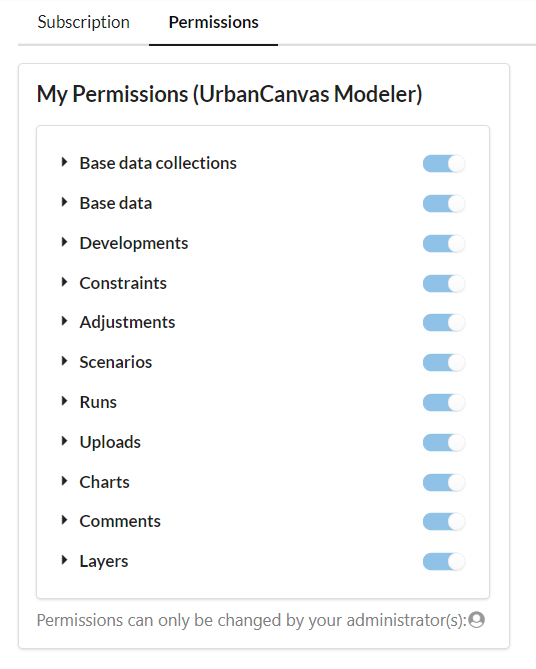
Enabled features are displayed with toggles turned on with enabled feature permissions displayed with check marks. Features and feature permissions greyed out are not editable by your user role.

Changing role permissions (Admin only)
Administrators that have UrbanCanvas Viewer enabled will be able to turn map layers on and off for Viewers to view or select a specific set of layers for Viewers to access. UrbanCanvas Viewer is enabled for subscribers that have the Viewer as part of their subscription agreement. To enable UrbanCanvas Viewer for your subscription contact info@urbansim.com for details.
Admin permissions table: Layer permissions disabled
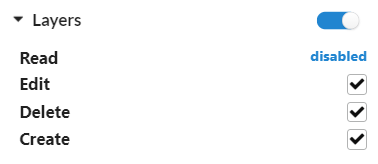
Disabling layers entirely will make all pre-existing and future layers (new layers created from uploads or simulations for example) inaccessible to Viewer users in the user interface. No layers can be accessed by Viewers.
Admin permissions table: Layer permissions enabled
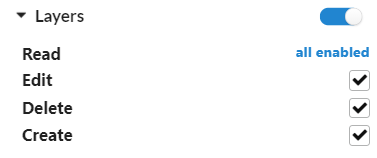
Enabling layers will make all pre-existing and future layers (new layers created from uploads or simulations for example) accessible to Viewer users in the user interface. All layers can be accessed by Viewers.
Admin permissions table: Layer permissions table with a selection of layers enabled for Viewers

Selecting a subset of layers to enable will make only those selected pre-existing layers accessible to Viewer users in the user interface. All other pre-existing and future layers (new layers created from uploads or simulations for example) will be inaccessible to Viewers. This is a useful feature to use to have a fine level of control over what layers are visible to Viewer users at any given time.
User roles
UrbanCanvas user roles can be assigned to users by Administrators and provide a way to manage different user permission levels for specific features and workflows within UrbanCanvas.
UrbanCanvas Administrator
Administrators have full UrbanCanvas permissions to all features. Administrators can invite new users, change user roles, and remove users in their subscription and can change global default user interface settings. Administrators that have UrbanCanvas Viewer enabled will also be able to turn map layers on and off for Viewers to view or select a specific set of layers for Viewers to access. A minimum of one administrator user is required for each account.
UrbanCanvas Modeler
Modeler users by default have full UrbanCanvas permissions to all features. Modelers cannot change role permissions or invite or change users in their subscription or change global default user interface settings.
UrbanCanvas Viewer
Viewer users by default only have permission to create, edit, delete, and download comments and view and symbolize map layers that the account administrator has enabled for Viewers. Viewers cannot change role permissions or invite or change users in their subscription. UrbanCanvas Viewer is enabled for subscribers that have the Viewer as part of their subscription agreement. To enable UrbanCanvas Viewer for your subscription contact info@urbansim.com for details.
UrbanCanvas Public Viewer
UrbanCanvas account owners can choose to open any of their UrbanCanvas regions to the general public as a permission based data viewer where public users can be assigned a Public Viewer role with map layer and chart viewing permissions. UrbanCanvas Public Viewer is enabled for subscribers that have the Public Viewer as part of their subscription agreement. To enable the UrbanCanvas Public Viewer feature for your subscription contact info@urbansim.com for details. Members of the public can register for Public Viewer regions on demand using the create UrbanSim UrbanCanvas user account page. Existing UrbanCanvas users can join Public Viewer regions by going to the Your regions page in the account manager and joining any Public Region that is available. Map layers and charts that Public Users can view can be customized and viewing behavior and symbology can be customized and configured to use default settings for user ease of use.
Your settings
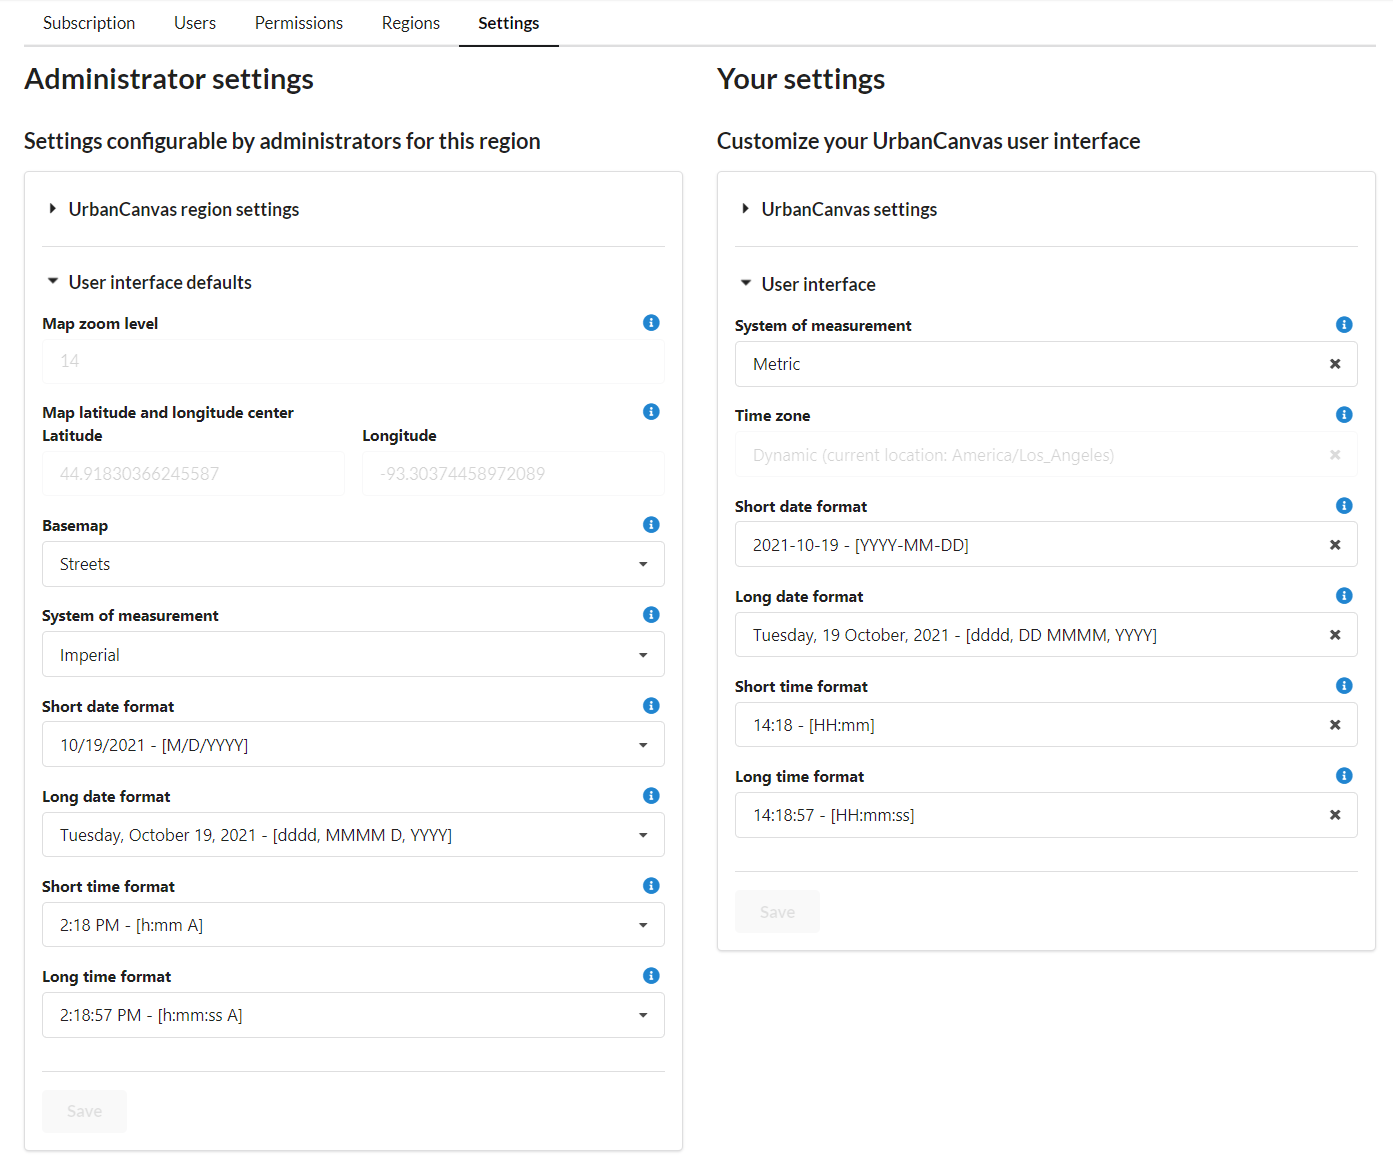
Account and UrbanCanvas user interface settings can be found within UrbanCanvas by going to the dropdown menu under your username and navigating to Manage Settings > Your Settings or can be accessed from within the UrbanSim Account Manager by selecting the Settings tab or going to the dropdown menu under your username and navigating to Your Settings. All settings on this page correspond to the region you are currently logged into. To change settings for a different region, first switch to that region and change the settings for that region in the settings page. The settings page contains two types of settings: 1) settings that can only be configured by administrators for your region that set default settings for all users inside of your region; and 2) settings that you can configure for your region that are only visible for your user account.
Note
Contact us here request changes to any settings that are not yet configurable from the user interface. Settings not configurable are shown greyed out on the settings page.
Administrator settings
Administrators can change the default settings for all users in the currently selected region. Users in the region can then at any time change the corresponding user setting on their settings page for the same region. There are two types of settings that can be configured by administrators: 1) UrbanCanvas region settings: settings that correspond to region model configuration; and 2) User interface defaults: settings that correspond to the user interface that all users in the region will see when they login to the region but can change a subset of these settings on their own if they desire. Configurable settings are below:
UrbanCanvas region settings
Spatial reference system (SRS)
The local projected spatial reference system (SRS) as the European Petroleum Survey Group (EPSG) Geodetic Parameter Dataset identifier for the region used for area calculation. This setting is currently not configurable in the user interface.
Model template
The UrbanSim model template type (e.g. Block, Parcel, or Zone) for the region. This setting is currently not configurable in the user interface.
Model base year
The base year of the UrbanSim model for the region. This setting is currently not configurable in the user interface.
Model system of measurement
The system of measurement for the region that is native to the UrbanSim simulation and base data which can be either the imperial or metric system. All inputs sent to the simulation and all outputs from the simulation will be in this system of measurement. Users can independently configure the system of measurement displayed in their user interface which does not impact the Model system of measurement. This setting is currently not configurable in the user interface.
Residential vacancy rate
The default residential vacancy rate for the region populated in the scenario form residential vacancy rate box in the user interface. The default vacancy rate is based on residential vacancy in the base year data and can be changed by request by contacting us here. Vacancy rate must be greater than 0 and expressed as a percentage and not all model types use this vacancy rate in the scenario form.
User interface defaults
Map zoom level
The default map zoom level for the region that is used to determine the zoom level that users will be taken to when they first access the map in UrbanCanvas. This zoom level can also be used by users to reset their map view if they get lost by using the crosshair button on the map. This setting is currently not configurable in the user interface.
Map latitude and longitude center
The default map latitude and longitude center for the region that is used to determine the location that users will be taken to when they first access the map in UrbanCanvas. This location can also be used by users to reset their map view if they get lost by using the crosshair button on the map. This setting is currently not configurable in the user interface.
Basemap
The basemap that is shown by default on the map for all users in the region can be changed to a specific basemap. Users can change the basemap at anytime and the user interface will remember the basemap they last chose.
System of measurement
The system of measurement displayed in the user interface can be changed to display either imperial or metric system units. This will only change the units that are displayed in the user interface or for data downloads not related to the simulation. The simulation will continue to operate in the system of measurement native to the model base data and all inputs sent to the simulation and all outputs from the simulation will be in the model’s native measurement system which is configured in the Model system of measurement setting. The default settings used here will be applied to all users in the region who have not yet changed their own user interface settings. Users can change their own settings at any time.
Short and long date and time format
All date and time stamps shown in the user interface can be customized to be shown in a specific format. This includes simulation run, file upload, chart, and comment timestamps. The default settings used here will be applied to all users in the region who have not yet changed their own user interface settings. Users can change their own settings at any time.
User settings
Users can change their settings for the currently selected region. There are two types of settings that can be configured by users: 1) UrbanCanvas settings: settings that correspond to your general UrbanCanvas account; and 2) User interface: settings that correspond to the user interface that the user sees when they login to the region. By default users will have these settings set to the region default settings that were selected by the administrator. These settings can be changed at anytime and will only change the user interface for the user’s own user interface for the currently selected region. Settings set as Region default will inherit the default option specified by the administrator in the administrator settings section. At anytime if you have made a change to your user settings and wish to revert back to the defaults set by the administrator, click on the x button in the dropdown menu to reset your setting to Region default. Configurable settings are below:
UrbanCanvas settings
Default region
Users whose accounts are associated with multiple UrbanCanvas regions have the option to change the login behaviour of UrbanCanvas. The region selected as the default region will be the region that your user account will always login to when logging into UrbanCanvas.
User interface
System of measurement
The system of measurement displayed in the user interface can be changed to display either imperial or metric system units. This will only change the units that are displayed in the user interface or for data downloads not related to the simulation. The simulation will continue to operate in the system of measurement native to the model base data and all inputs sent to the simulation and all outputs from the simulation will be in the model’s native measurement system which is configured by administrators in the Model system of measurement setting.
Time zone
The time zone that all date and time stamps shown in the user interface are shown in. By default, your local system time zone on the machine that you are using to view UrbanCanvas with will be the time zone used in the user interface. This setting is currently not configurable.
Short and long date and time format
All date and time stamps shown in the user interface can be customized to be shown in a specific format. This includes simulation run, file upload, chart, and comment timestamps.
Your account security
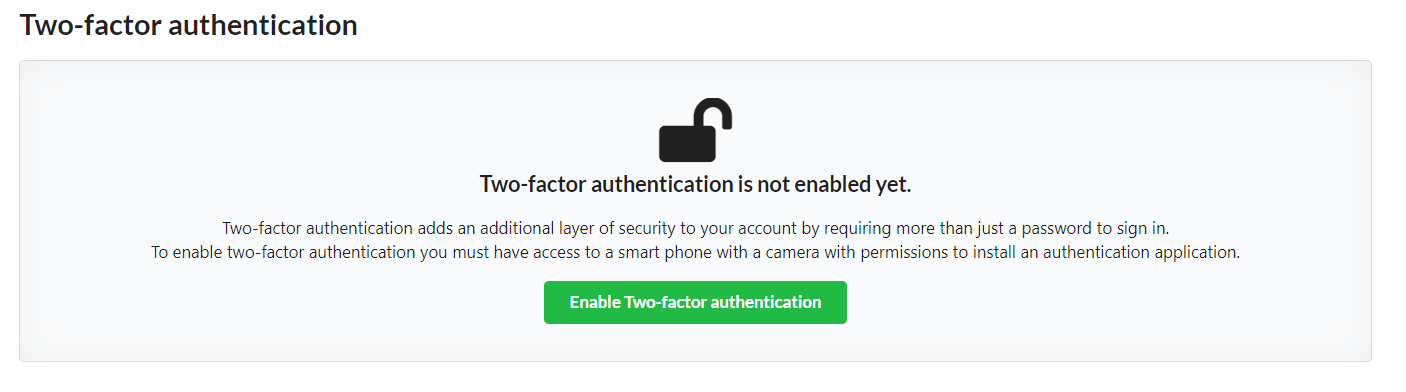
Account security settings can be found within UrbanCanvas by going to the dropdown menu under your username and navigating to Manage Settings > Your account security or can be accessed from within the UrbanSim Account Manager by selecting the Security tab or going to the dropdown menu under your username and navigating to Your account security. From account security you can choose to enable or disable two-factor authentication.
Two-factor Authentication via Authentication Application
Two-factor authentication is an optional additional layer of security you can add to your account by requiring more than just a password to sign in. Two-factor authentication is recommended to enhance the security of your account. To enable two-factor authentication, you must have a smartphone with a camera in order to read the QR code to setup authentication and have permissions to install a two-factor authentication application. We recommend using Google Authenticator for your authentication application however other applications may also be used. Users who login via SSO cannot use two-factor authentication from UrbanSim, instead you can enable and use the two-factor authentication service available in your SSO application management service and login page. Contact your Enterprise Application manager for more information.
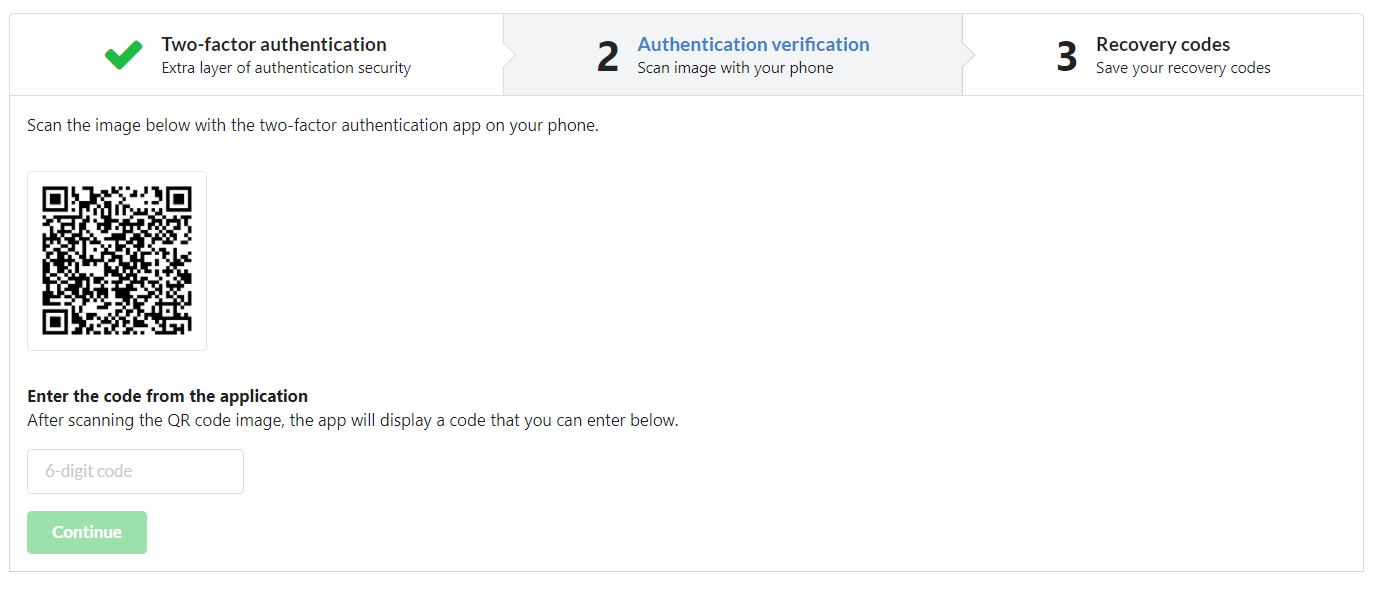
Enable two-factor authentication
To enable two-factor authentication, click on the enable button and follow the on screen steps.
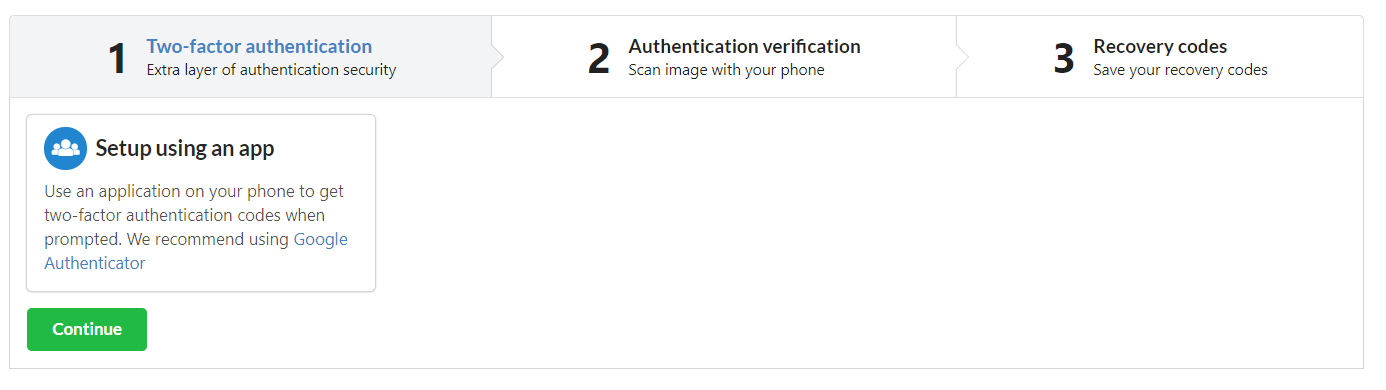
Scan the QR code using your smartphone authentication application and enter the 6-digit code provided by your authentication application to connect your device to your UrbanSim account.
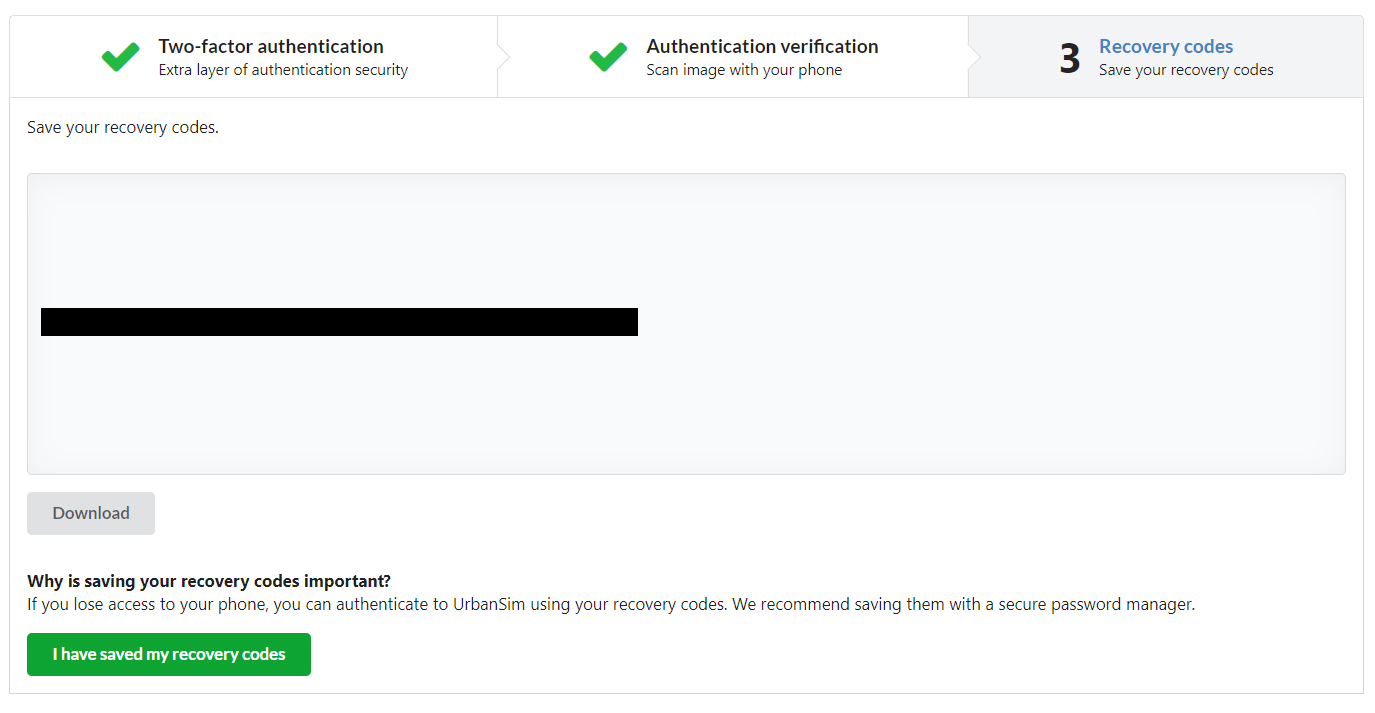
Save your two-factor authentication recovery code in a secure location, it is recommended to use a secure password manager. This recovery code can be used to login to your account in case you lose access to your device that is registered with UrbanSim for two-factor authentication. To login using your recovery code see here.
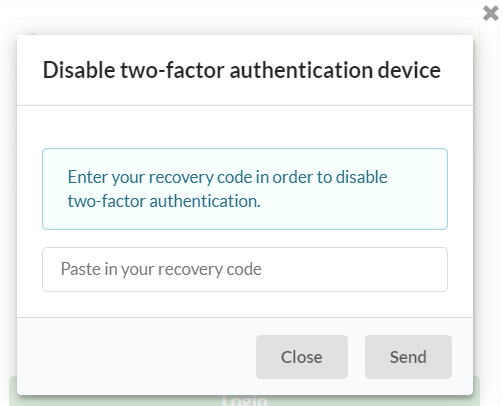
Disable two-factor authentication
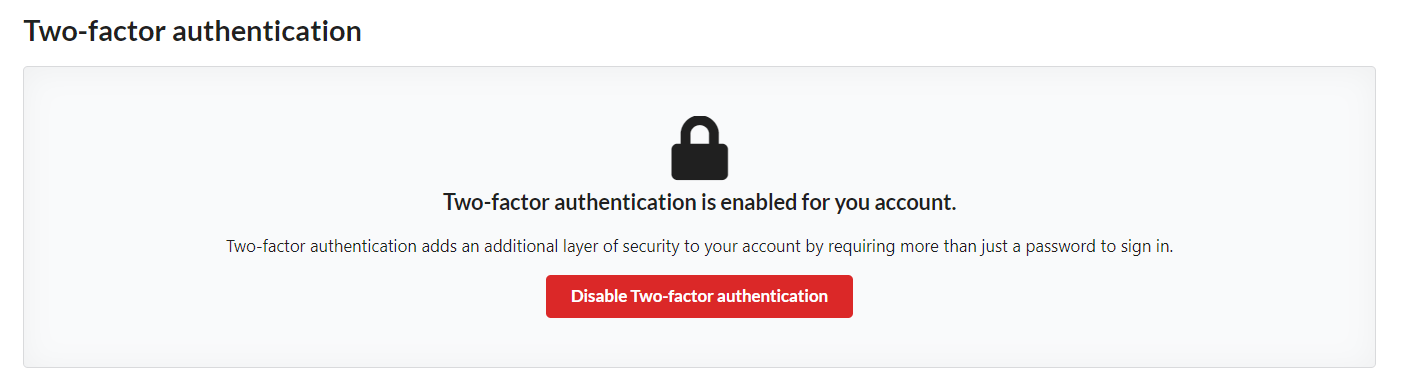
At anytime you can choose to disable two-factor authentication. If you are planning to change the device registered to use two-factor authentication you must first disable two-factor authentication and then enable two-factor authentication using the new device.
Login with two-factor authentication
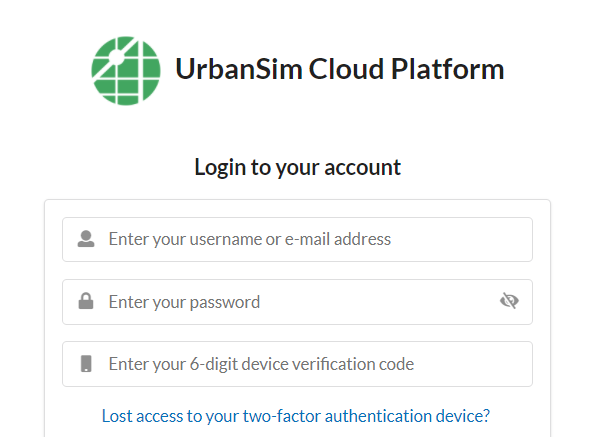
Once you have enabled two-factor authentication on your account, you can login with your credentials using the UrbanCanvas login page. Then you will be prompted to enter your 6-digit two-factor authentication code displayed on your authentication application.
Two-factor authentication recovery code
If you have lost access to the device you have registered with UrbanSim for two-factor authentication, you can use your recovery code to login to your account. Recovery codes can be entered on the UrbanCanvas login page after you login with your credentials. Click on the Lost access to your two-factor authentication device? link and enter your saved recovery code. This will log you into UrbanCanvas and will automatically disable two-factor authentication. You can then re-enable two-factor authentication with another device.
Single sign-on (SSO)
Microsoft Azure AD
UrbanCanvas supports single sign-on (SSO) via Microsoft Azure Active Directory (AD) non-gallery Enterprise Applications. Single sign-on is a method of authentication that allows users to login to multiple disparate applications with a single account and password. Microsoft Azure AD is a cloud-based identity and access management service that offers a single portal from which organizations and users can access multiple software as a service (SaaS) applications. Azure AD enables multiple federated identity protocols and authentication methods to support the automated management of user accounts in federated applications. UrbanCanvas subscription holders who utilize Microsoft Azure AD SSO for their applications can access UrbanCanvas as an Enterprise non-gallery application. SSO is configured using the System for Cross-domain Identity Management (SAML) 2.0 protocol and supports auto-provisioning of roles, users and groups using the SAML 2.0 protocol. Auto-provision is supported out of the box. Login and logout are both identity provider (IdP) initiated, with logout utilizing the Single Logout (SLO) SAML 2.0 protocol on top of a standardized REST API post logout method.
Note
For more technical information on SSO and Microsoft Azure AD for UrbanCanvas contact us here. Contact info@urbansim.com for more information on how to get access to UrbanCanvas on Microsoft Azure AD.
Login via single sign-on
UrbanCanvas Azure AD SSO users can access UrbanCanvas through the Microsoft Azure My Apps Portal. Login to Azure My Apps with your Microsoft account credentials for the organization that manages your UrbanCanvas account. Go to My Apps and click on the UrbanCanvas application icon. UrbanCanvas will automatically open in a new browser tab and log you in to your UrbanCanvas account.
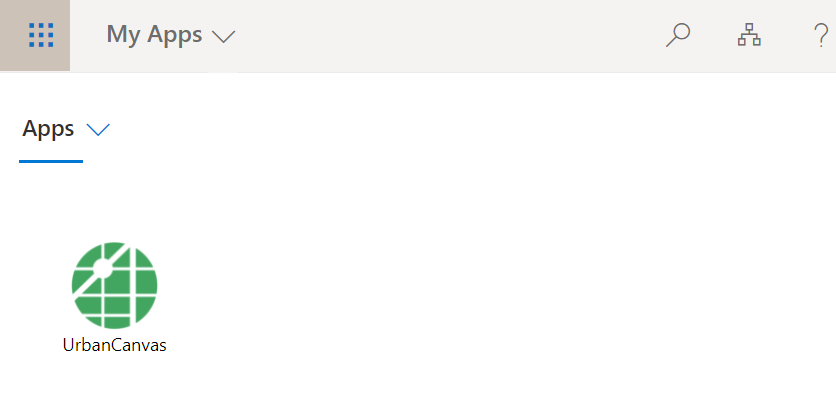
You can also access UrbanCanvas by going to the UrbanCanvas login page and clicking on the Login with Azure AD button. This will take you to the Microsoft Azure My Apps Portal. Then follow the same instructions as above.

Logout via single sign-on
UrbanCanvas Azure AD SSO users must logout of UrbanCanvas using the logout button inside of the UrbanCanvas user interface which will propagate logout to UrbanCanvas and Azure APIs, instead of logging out through the Azure AD Portal.
Microsoft Azure AD UrbanCanvas Activation Requirements and Usage Tips
The following are required in order for UrbanSim to activate UrbanCanvas on your Microsoft Azure AD account:
UrbanSim will provide your Enterprise Application manager a Federation Metadata XML File and supporting documentation to use to configure UrbanCanvas for your Microsoft Azure AD account.
UrbanSim requires your Enterprise Application manager to provide us with a SAML Signing Certificate (Base 64) and a SAML entrypoint or Login URL. This information can be found at your non-gallery Enterprise Application Single sign-on configuration options after SAML 2.0 protocol is selected.
UrbanSim will need information on the Azure AD Groups you wish to use to map to UrbanCanvas user roles.
The minimum user attributes required to map Azure AD users to UrbanCanvas users are: name and email address.
Note
After your initial configuration is completed by UrbanSim, any changes related to SSO SAML Certificates, entry points or auto-provision tokens must be reported to UrbanSim beforehand. Otherwise SSO features may not work as expected and could cause disruption of service until UrbanSim is provided these updates. Contact us here to report any such changes.
Here are some tips for managing UrbanCanvas accounts from Microsoft Azure AD:
Note that if using Microsoft Azure AD, your user account (e.g. profile, username, email, password, user role permissions) are directly managed from Azure AD by your Enterprise Application manager. You cannot use the UrbanCanvas account manager to change any of these user account attributes. Areas within the UrbanCanvas account manager that are not applicable to editing will have a notification displayed and editing disabled.
Enterprise Application managers can add new UrbanCanvas users, remove existing users, and change user role permissions (e.g. UrbanCanvas Admins, Modelers, Viewers etc.) using Groups from within your Azure AD Portal. Note any user account changes may take 4-45 minutes to provision to your system. Check the UrbanCanvas Enterprise Application provisioning log to verify when provisioning was completed.
Note every user must have the correct Azure AD Group assignment as per your Azure AD configuration.
UrbanCanvas notification emails related to changes in your user account will not be sent to UrbanCanvas Microsoft Azure AD users, instead notifications will be handled directly by Microsoft Azure AD.
Note
Note that the Microsoft Azure AD information here is provided as a convenience, however services and settings may change over time and it is suggested to review the official Microsoft Azure AD documentation for the most up to date information.